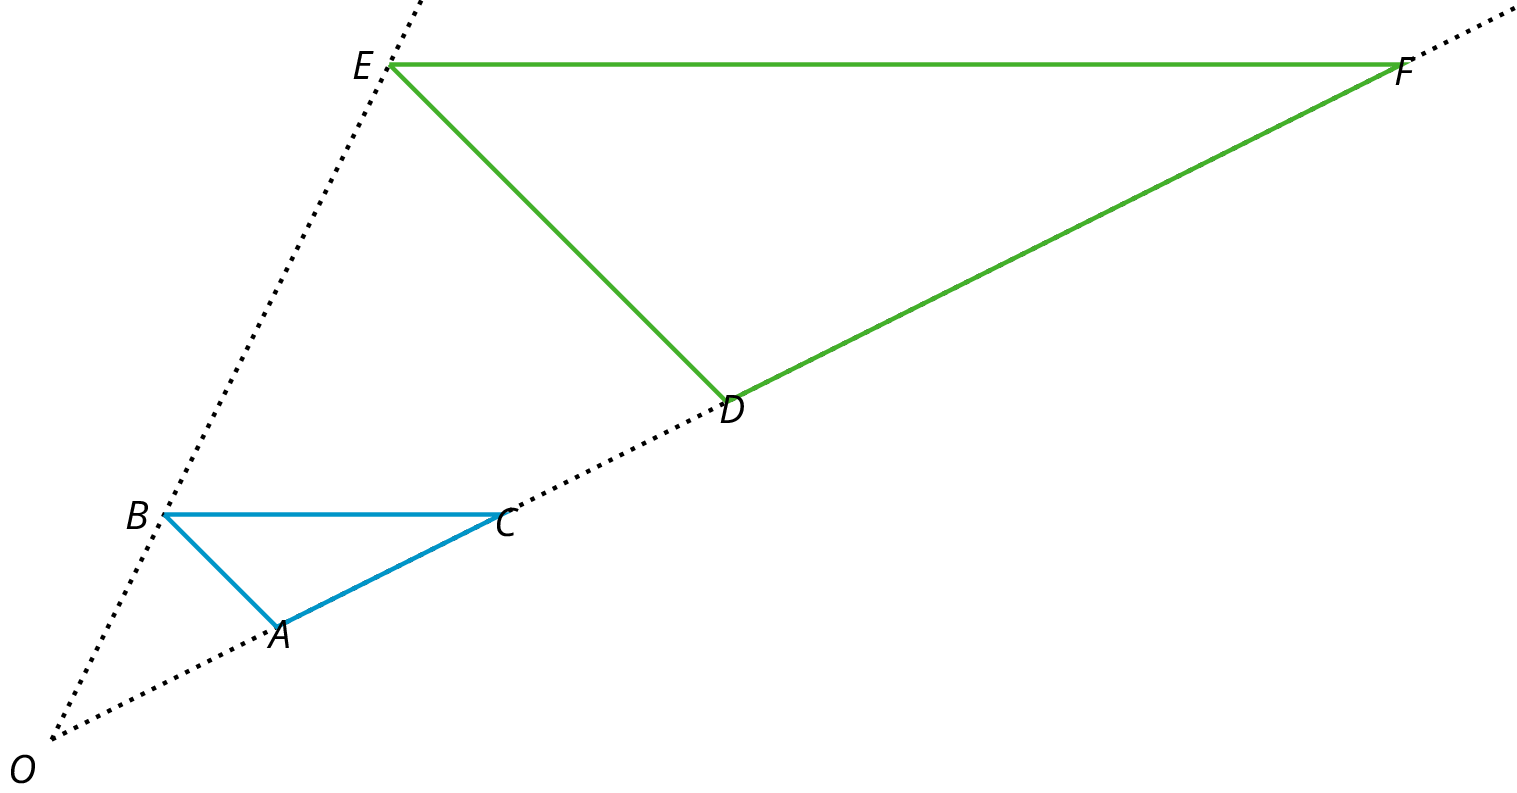
The triangle \(DEF\) is a dilation of the triangle \(ABC\) with center \(O\) and with scale factor 3. So \(D\) is 3 times further away from \(O\) than \(A\) is, \(E\) is 3 times further away from \(O\) than \(B\) is, and \(F\) is 3 times further away from \(O\) than \(C\) is.
Lesson 9
Dilations
Lesson Narrative
The previous lesson introduced the general idea of a dilation as a method for producing scaled copies of geometric figures. This lesson formally introduces a method for producing dilations. A dilation has a center and a scale factor. For a dilation with center \(P\) and scale factor 2, for example, the center does not move. Meanwhile each point \(Q\) stays on ray \(PQ\) but its distance from \(P\) doubles (because the scale factor is 2).
A circular grid is an effective tool for performing a dilation. A circular grid has circles with radius 1 unit, 2 units, and so on all sharing the same center. Students experiment with dilations on a circular grid, where the center of dilation is the common center of the circles. By using the structure of the grid, they make several important discoveries about the images of figures after a dilation including:
- Each grid circle maps to a grid circle.
- Line segments map to line segments and, in particular, the image of a polygon is a scaled copy of the polygon.
Students then apply dilations to points with no grid. In order to perform a dilation, three pieces of information are still needed: a center of dilation, a scale factor, and a point which is dilated. Students practice identifying centers, scale factors, and images of dilation. They also use dilations to make perspective drawings.
Performing dilations without a grid gives students a chance to make sense of problems and persevere in solving them (MP1) as they think about the meaning of dilation in terms of the given information (center, scale factor, point being dilated).
The next several lessons focus on dilations on a square grid, solidifying student understanding of the relationship between a polygon and its dilated image. This echoes similar work in the previous unit investigating the relationship between a figure and its image under a rigid transformation.
As with previous geometry lessons, students should have access to geometry toolkits so they can make strategic choices about which tools to use (MP5).
Learning Goals
Teacher Facing
-
Create a dilation of a figure given a scale factor and center of dilation.
-
Explain (orally) how a dilation affects the size, side lengths and angles of polygons.
-
Explain (orally) the effect of the scale factor on the size of the image of a polygon and its distance from the center of dilation.
Student Facing
Let’s dilate figures.
Required Materials
Required Preparation
Ensure that rulers, index cards, and colored pencils are available in the geometry toolkits.
Learning Targets
Student Facing
-
I can apply a dilation to a polygon using a ruler.
-
I can apply dilations to figures on a circular grid when the center of dilation is the center of the grid.
Glossary Entries
-
center of a dilation
The center of a dilation is a fixed point on a plane. It is the starting point from which we measure distances in a dilation.
In this diagram, point \(P\) is the center of the dilation.
-
dilation
A dilation with center \(O\) and positive scale factor \(r\) takes a point \(P\) along the line \(OP\) to another point whose distance is \(r\) times further away from \(O\) than \(P\) is. If \(r < 1\) then the new point is really closer to \(O\), not further away.
Print Formatted Materials
Teachers with a valid work email address can click here to register or sign in for free access to Cool Down, Teacher Guide, and PowerPoint materials.
| Student Task Statements | docx | |
| Cumulative Practice Problem Set | docx | |
| Cool Down | Log In | |
| Teacher Guide | Log In | |
| Teacher Presentation Materials | docx |